ShopDreamUp AI ArtDreamUp
Deviation Actions


Suggested Deviants


Suggested Collections


You Might Like…


Featured in Groups


Description
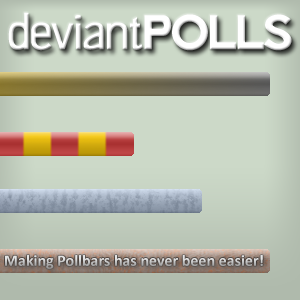
>MISSION STATEMENT<
So I was fooling around with my Stylish application, adding skins and such, when I found that my pollbars never changed when I wanted them to. No matter where I looked, though, I couldn't find a single useful resource for creating custom pollbars. The users who would have known such things (!little-princess and !DCZed) left for no discernible reason, leaving me without a convenient way to create them.
So I ended up making my own resource.
>THE METHOD<
I took deviantART's default pollbar style, examined it and stripped it down to the bare essentials: Color, Shade, and the ever-so-necessary bits that connect the pollbar to its trough. The latter part I left alone. I then replaced the colors with something basic, and tried out different shading techniques before settling on Luminosity-blending highlights/tones. Finally, I assembled them in layers (and added an alpha channel) for convenience. Thus, I created a reliable resource for creating pollbars.
>HOW TO INSTALL CUSTOM POLLBARS<
1. Install the Stylish or Greasemonkey add-on.
2. Download this ZIP file, which contains a PSD for custom pollbars.
3. Manipulate to your liking, then save as a PNG.
4. Upload that PNG to your favorite image host.
5. Load your text editor (Greasemonkey) or find the S-jigsaw icon, open the menu and go to "Write new style > for deviantart.com" (These bars only work on this site) (Stylish).
6. Copy the following (taking care not to include the spaces in the links), replace the link in the italicized portion with your uploaded image, and save:
(The following is optional and may be changed to better suit the bars:
)
7. Your bars are ready!
>CAVEAT<
The bars will slide in from the left. As such, only their rightmost parts will be visible. Therefore, try to create interesting designs that stretch across the whole of the bar. Also, unless you can also manipulate the troughs, leave those alone; otherwise, your polls will look a bit messed up.
>CREDIT<
Credit goes to =josephstaleknight for creating this tutorial, !DCZed for inspiring this and providing examples (even though he's no longer here), and Stylish/Greasemonkey for allowing us to manipulate the looks of our websites.
So I was fooling around with my Stylish application, adding skins and such, when I found that my pollbars never changed when I wanted them to. No matter where I looked, though, I couldn't find a single useful resource for creating custom pollbars. The users who would have known such things (!little-princess and !DCZed) left for no discernible reason, leaving me without a convenient way to create them.
So I ended up making my own resource.
>THE METHOD<
I took deviantART's default pollbar style, examined it and stripped it down to the bare essentials: Color, Shade, and the ever-so-necessary bits that connect the pollbar to its trough. The latter part I left alone. I then replaced the colors with something basic, and tried out different shading techniques before settling on Luminosity-blending highlights/tones. Finally, I assembled them in layers (and added an alpha channel) for convenience. Thus, I created a reliable resource for creating pollbars.
>HOW TO INSTALL CUSTOM POLLBARS<
1. Install the Stylish or Greasemonkey add-on.
2. Download this ZIP file, which contains a PSD for custom pollbars.
3. Manipulate to your liking, then save as a PNG.
4. Upload that PNG to your favorite image host.
5. Load your text editor (Greasemonkey) or find the S-jigsaw icon, open the menu and go to "Write new style > for deviantart.com" (These bars only work on this site) (Stylish).
6. Copy the following (taking care not to include the spaces in the links), replace the link in the italicized portion with your uploaded image, and save:
@namespace url(h ttp://www.w3.org/1999/xhtml);

@-moz-document domain("deviantart.com") {

/* Userpage & message center poll */

div.ctube div.cfill {

 background:url(htt p://www.yourimagehost.com/yourimagepath.png)!important;

}

div.ctube div.cfill span.sub10 {

color:#FFFFFF!important;

}
(The following is optional and may be changed to better suit the bars:
/* Footer poll */

.pollpole, .poll-bar {

 background-color:#faf6f7!important;

 border-color:#ff008d!important;

 color:#230118!important;

}

.pollpole {

 border-top:0px!important;

 border-bottom:0px!important;

 border-right:0px!important;

}

.poll_form .poll-bar i.tr, .poll_form .poll-bar i.tl, .poll_form .poll-bar i.br, .poll_form .poll-bar i.bl {

 border-color:#d6ded4!important;

}

}
)
7. Your bars are ready!
>CAVEAT<
The bars will slide in from the left. As such, only their rightmost parts will be visible. Therefore, try to create interesting designs that stretch across the whole of the bar. Also, unless you can also manipulate the troughs, leave those alone; otherwise, your polls will look a bit messed up.
>CREDIT<
Credit goes to =josephstaleknight for creating this tutorial, !DCZed for inspiring this and providing examples (even though he's no longer here), and Stylish/Greasemonkey for allowing us to manipulate the looks of our websites.
Comments15
Join the community to add your comment. Already a deviant? Log In
I just stumbled on this from fav-hopping. I know it's old and stuff but DCZed does still exist, he's omgitsacat and he'd probably be pretty honoured to find out he inspired this lol